You’ve done it! You’ve purchased your very own photoelectric smoke alarm (or a series of them), and you’re ready to begin your installation. Our team has spent ten years refining the science behind our smoke alarms. We’ve made them smaller, more efficient, and better at detecting early fires. On top of all that, we’ve also worked hard to make installation as easy as possible.
Read on for a detailed breakdown of how to install the CAVIUS 10-Year Battery-Operated Photoelectric Smoke Alarm. From choosing the right spot in your home to connecting your new alarm to the other alarms in the family, we’re covering everything you need to know.
Find the Right Spot for Your Smoke Alarm
Our photoelectric smoke alarms work by detecting the particulate matter in smoke. Housed within the chamber of the smoke alarm is a small beam of light. If that light is broken or disrupted, the alarm trips. Thanks to this carefully-curated system, photoelectric systems are less likely to trigger false alarms.
That said, they have to be installed in the right places to work at peak efficiency. So, step number one is to identify the best spot in your property for your new smoke alarm.
As a general rule of thumb, you should install alarms on each floor of your home in the areas between rooms, such as hallways and stairways. You should also have an alarm in each room, including your bedrooms and living room.
Avoid dusty or humid rooms, such as your bathroom, laundry, or kitchen. Instead, place the alarm as close as you can to said room without putting it in the path of too much humidity or steam, as close proximity can trigger false alarms. For these rooms, we’d recommend installing a heat-sensitive alarm instead.
Where possible, install your smoke alarm at least 50cm from the corner where your ceiling and wall meet. Avoid placing them at the top of high pointed ceilings, as this will make them less effective at early fire detection. Not to mention, you won’t be able to reach them easily for regular maintenance!

Link Your Alarms
Once you’ve decided on placement, it’s time to link your alarms together. If you’re installing multiple CAVIUS photoelectric smoke alarms, then you can connect them to one another in less than a minute. No internet necessary!
Start by sliding the switch on the backs of every new alarm into the ‘Link Mode’ position. From there, choose only one of your alarms (and make note of which one you’ve chosen for future reference). Press the button on top to designate this alarm as the ‘Master’. Once that’s done, the ‘Master’ alarm will send out a specific house code to all other functioning alarms in your house, which you’ll see by the red flashing LED.
These linked alarms will all sound at the same time if just of them detects evidence of a fire. This ensures you won’t miss a smoke alarm happening on another level of the house until it’s too late to evacuate safely.
Install Your Alarm
There are two different versions of our smoke alarms. The standard option uses a mounting base to attach the base of your smoke alarm to a ceiling or wall. The recessed option makes our nano smoke alarms even more discreet by setting the alarm flush with your wall or ceiling.
Either option is easy to install at home and applicable for both wall or ceiling installations. Make sure not to remove the label on the base of your smoke alarm, as it contains important information you might need for future inspections, warranties, and reports!
Standard Option
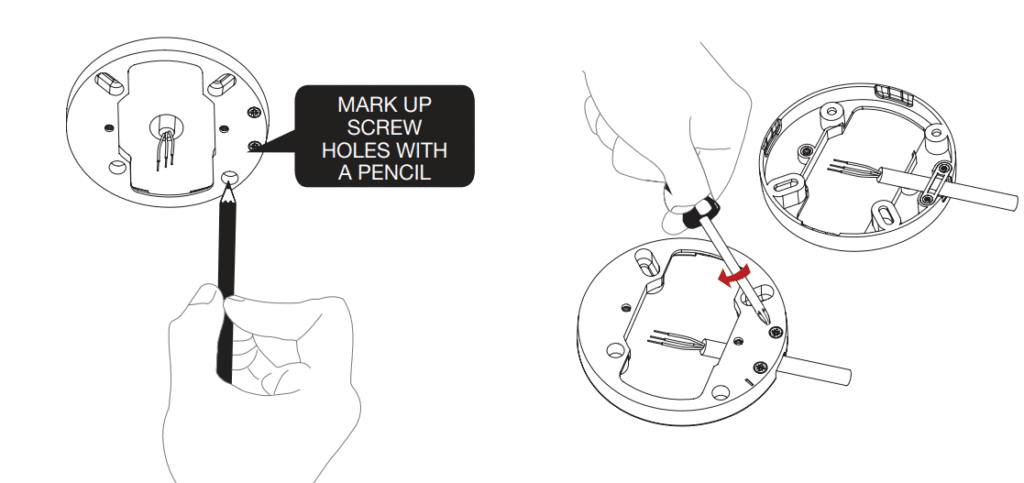
- Start by using the mounting base ring as a template. Hold it up to the ceiling or wall and use a pencil to mark out the two screw holes on either side.
- Your kit comes with enclosed screws and plugs for installation. Use these to screw the mounting base ring to your chosen spot.
- Remove the safety lock from the mounting base (you should see it between the two screw holes).
- Once done, simple click the nano smoke alarm firmly into the base ring to activate it.
- Finish off by sliding the Safety lock into the slot. This keeps the smoke alarm firmly attached.
You can refer to the user guide from CAVIUS 2203 CAVMP
Recessed Option
- Start by using the Cover Ring from your recess kit as a template. Place the ring where you want to install the smoke alarm, then trace around the inside of the ring.
- Use an 81mm to 85mm hole saw to cut a hole into the surface. Make sure that you are not cutting into an area with wiring or electrical equipment behind the surface, as this could cause severe damage to you and your home!
- Insert the recess kit mounting base into the hole, then secure with screws.
- Finally, firmly click the smoke alarm into the recessed base and finish it off by placing the cover ring around the edges of the base.
You can refer to the user guide from CAVIUS CAV10WF
Once all your smoke alarms are installed, you’re officially a fire safe home! As mentioned, we recommend installing heat alarms in your bathroom, kitchen, and laundry as a way to remain fire safe without setting off false alarms with the steam. Make sure to also introduce a carbon monoxide detector into your alarm network for full protection.
These alarms will last you for a full decade with some simple upkeep. Every quarter or so, give your alarms a quick test to make sure they’re in tip-top shape, and you’ll be golden for years to come.
Embrace safety by design with the CAVIUS family of photoelectric smoke alarms.
With over ten years of battery life, wireless connectivity, and our patented core technology, our range of smoke alarms is the last word in fire safety.
We’ve designed these alarms to blend seamlessly with your home’s décor, ensuring you can rest easy without a traditional smoke alarm marring the flow of your space.
Learn more about our top-of-the-line photoelectric smoke alarms or browse the CAVIUS product family for other options today.